All here published content is created by humans, without any use of LLMs or AI in general. This disclaimer is inspired by Howard Oakley’s article.
Alles hier geschriebene wurde von Menschen erstellt, vollkommen ohne die Nutzung von LLMs oder KI im Allgemeinen. Diese Stellungnahme wurde durch Howard Oakleys Artikel inspriert.
See part 1, if you want general information on how to implement 802.1X device certificates with Jamf via the ACME protocol.
Our whole workflow does, what it should do, right? Not quite, the renewal process of the certificates is not configurable. But Jamf did just that with the release of 11.19.0 of Jamf Pro.
Renewal of certificates
Now, it is possible to set a renewal date relative to the expiry date!
As our certificates are valid for 90 days, we chose 30 days until expiry as a good starting point. It is long enough, so that vacations or business trips don’t end with an expired certificate.
Screenshot
Change the value from never to the desired interval e.g. 30 days.
Further thoughts about the whole ACME workflow
A revocation procedure would be nice. This might be useful, when a device gets compromised or stolen. Sadly, step-ca does not support a certificate-revocation-list, but certificates can be revoked manually. See here for further details.
Instead of deploying a completely new root-ca, maybe an existing one can be used as a trust anchor and our intermediate-ca can be signed by that? There is also documentation available for that case.
Our iPads can be managed the same way, just a different webhook is needed.
What about signing certificates for Android or Windows devices? They can’t use the device attestation protocol with Apple’s servers. Android devices may come into Jamf one day, our active directory for the Windows devices could be deprecated, once Microsoft chose to do that.
At work, our Windows computers are bound to AD, they use the AD-integrated PKI to generate device certificates. These certificates are then utilized to get 802.1X authenticated network access, both wired and Wi-Fi.
Our Macs are not bound to AD, but managed with Jamf Pro as our MDM system. In order to also bring the Macs into the network, we had to prepare a few things:
Set up a separate certificate authority (CA), at best on premise and also without additional costs.
Chose a protocol for certificate creation, SCEP or ACME.
Build a configuration profile for Jamf, so the Macs get certificates and also renewals.
Integrate our new CA into our network tool (Cisco ISE)
Our options for free, open source and locally deployable CA’s are quite limited, also the support for Managed-Device-Attestation (MDA) from Apple was desired. This led us to smallstep’s step-ca in conjunction with the Step Posture Connector and ACME as the protocol that supports MDA.
1. The CA
Let’s start with the setup of step-ca on an Ubuntu server. The firewall has to allow Port 443 for all the jamf servers, and for the company network, so the Macs can also reach it. Additional documentation from smallstep is available here:
… ✔ Deployment Type: Standalone What would you like to name your new PKI? ✔ (e.g. Smallstep): OurTestCA What DNS names or IP addresses will clients use to reach your CA? ✔ (e.g. ca.example.com[,10.1.2.3,etc.]): catest.domain.name What IP and port will your new CA bind to? (:443 will bind to 0.0.0.0:443) ✔ (e.g. :443 or 127.0.0.1:443): :443 What would you like to name the CA’s first provisioner? ✔ (e.g. you@smallstep.com): your.address@domain.name ✔ [leave empty and we’ll generate one]: ✔ Password: ThisIsATopSecretRootPasswordExample
Take good care of the newly created root password!
Now, let’s move the CA to /etc/step-ca and create a daemon to start it automatically. See this guide for it. The root password should now be in /etc/step-ca/password.txt
Best practice for additional security is to change the password for the intermediate certificate, as it is used to sign our device certificates, and it then differs from your root certificates‘ password. See also this guide.
The CA on its own is now ready to use, but for signing device certificates, we need a template. You can use this example for it. The file should be here: /etc/step-ca/templates/certs/x509/leaf.tpl It must also be added to the ca.json configuration.
We should also switch from file-based configuration to a database by enabling the remote provisioner management feature.
2. The Step Posture Connector
The final step for the CA setup is the creation of a webhook. It is later used by the Step Posture Connector to enable the CA to talk to Jamf and Apple.
step ca provisioner webhook add acme-da step-posture-connector --url https://localhost:9443/webhook/device-attest?mode=computer
✔ CA Configuration: /etc/step-ca/config/ca.json No admin credentials found. You must login to execute admin commands. ✔ Please enter admin name/subject (e.g., name@example.com): step ✔ Provisioner: your.address@domain.name (JWK) Please enter the password to decrypt the provisioner key: Webhook ID: 5022a074-2b05-4n87-someMoreCharacters Secret: ThisIsATopSecretWebhookSecretExample
As the Connector runs on the same server, we use localhost:9443 as URL. For Jamf Pro, we have to select the device type, as mobiles are handled differently as computers.
Take a note of the Webhook-ID and the Secret, both are needed later.
We should change the expiration period of the certificates, as in default they last only 24 hours. We chose 90 days => 2160 hours.
step ca provisioner update acme-da --x509-min-dur 20m --x509-default-dur 2160h
Our CA uses the binary for Step Posture Connector, not the Docker container. As it is a standard Linux server, we took the amd64 file. It is then copied to /srv/www/htdocs on the server.
Also create a /srv/www/htdocs/ssl directory for the TLS certificates. Now we can use our CA to create the TLS certificates:
step ca certificate localhost server.pem server.key
# copy these to /srv/www/htdocs/ssl
cp server.pem /srv/www/htdocs/ssl/server.pem
cp server.key /srv/www/htdocs/ssl/server.key
# also copy the intermediate cert
cp /etc/step-ca/certs/intermediate_ca.crt /srv/www/htdocs/ssl/ca.pem
Since this certificate expires regularly, it has to be renewed, at best in a cronjob:
step ca renew --force /srv/www/htdocs/ssl/server.pem /srv/www/htdocs/ssl/server.key
We need a Jamf API role for the Connector, see also here. Take a note of the Jamf Client ID and Jamf Client Secret.
All these go into the .env configuration file in /srv/www/htdocs/, see also here.
Let’s start the connector and see, if everything is fine:
Everything is fine? Then create a cronjob and start the Connector @reboot and in background. Consider running the Connector as a normal user, not as root.
3. Jamf Configuration Profiles
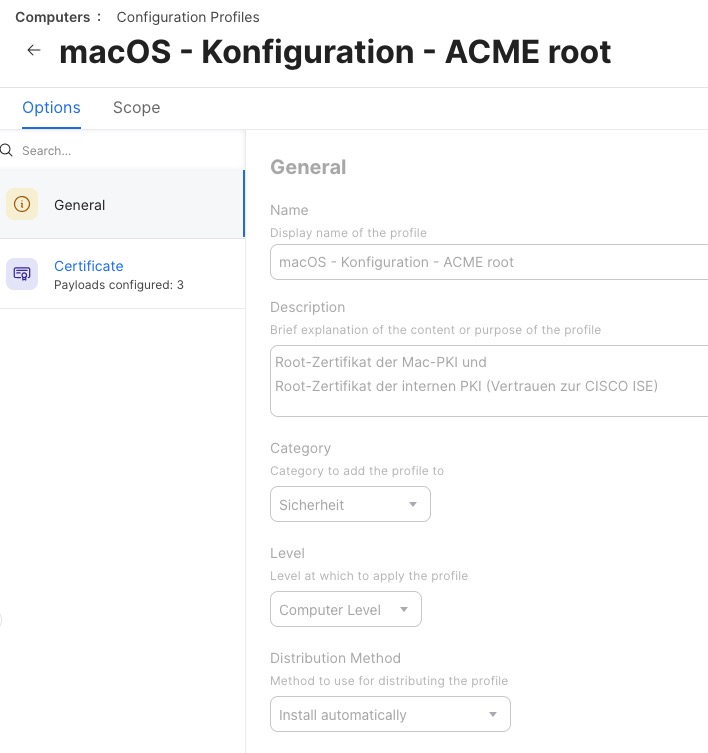
Now to the fun part. Create a Jamf configuration profile that contains your Root- and Intermediate Certificates (and also the certificate the network infrastructure uses), so the Macs trust your newly created CA.
Screenshot
The real fun starts now. Create a Jamf configuration profile with the ACME Payload, the certificate the network infrastructure uses and network configuration payload, all in one profile.
Screenshot
Let’s take a look at the details. The ACME payload sets the step-ca server, the encryption details, and enables attestation via MDA. The certificate’s Common Name (CN) is set to the serial number of the Mac, so we use the variable $SERIALNUMBER twice.
Screenshot
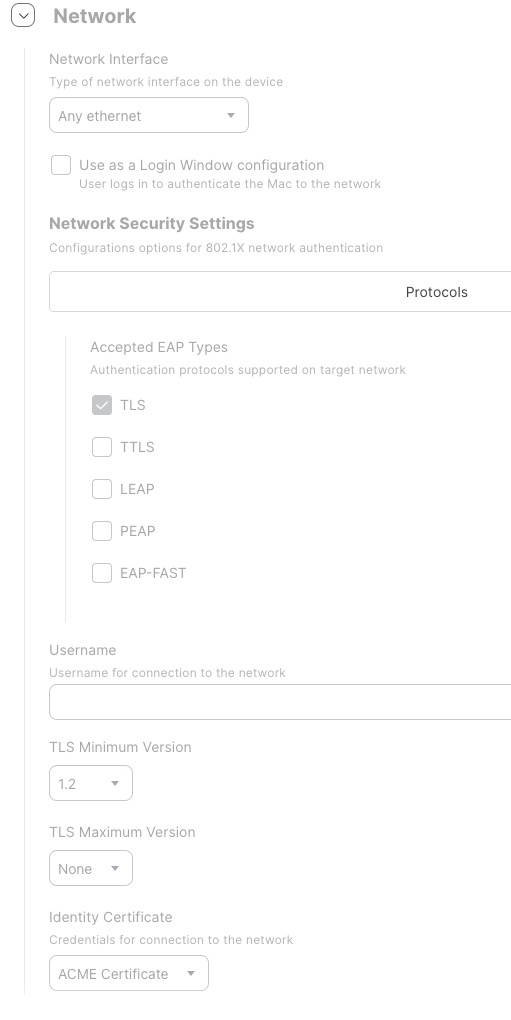
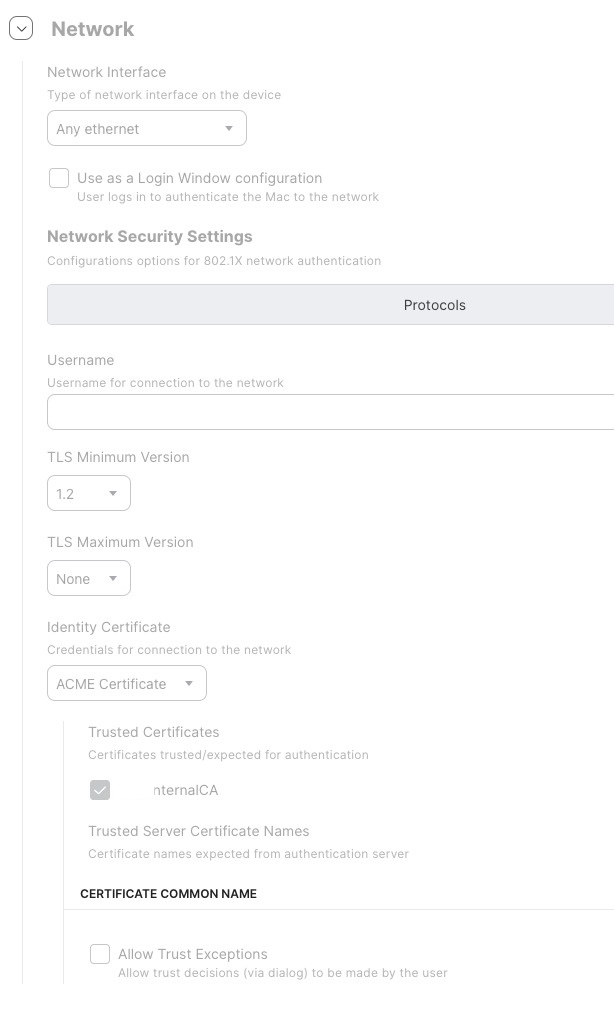
The Network payload uses the just configured ACME certificate and also the additional certificate for trusting our Cisco ISE. We use EAP-TLS.
Screenshot
The trust settings can be seen here:
Screenshot
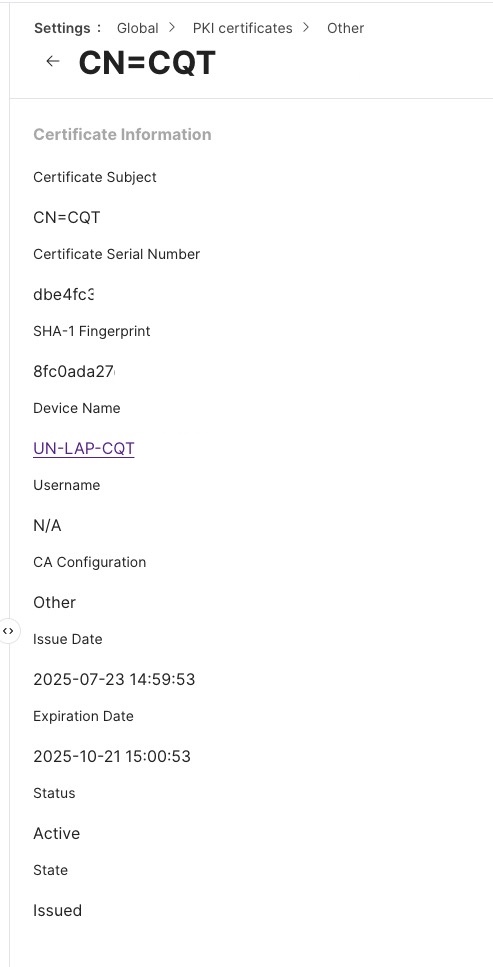
When these configuration profiles are deployed, the Macs then get a certificate.
Screenshot
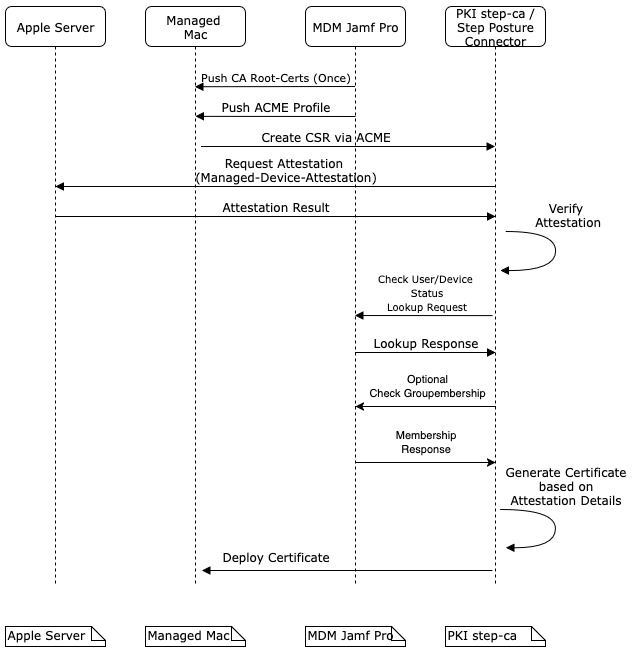
The sequence of the certificate generation with ACME protocol can be seen in this diagram. It shows, how all the components work together.
Sequence diagram of certificate generation with ACME.
The certificates are valid for 90 days, they are automatically renewed, when the Macs are a part of the companies network, e.g. Wi-Fi or LAN on premise or via VPN.
4. Network access
Our Cisco ISE needed the Root- and Intermediate-certificates and imported them.
When a Mac now connects to a network port, it shows the device certificate, the ISE matches the issuer of the certificate with the ones it imported before and if everything checks out, the ISE grants network access to a special, 802.1X protected subnet and the Mac gets an IP address.
That’s it.
5. Caveats
It works fine with ARM Macs, with Intel Macs we’ve had some issues. The MDA has to be deactivated, thus only Intel Macs with T2 chip could possibly work, older would ones definitely not.
Our T2 Macs failed to get a certificate, but they are going to be replaced anyway.
Update 01.08.2025: See part 2 for further configuration of the renewal process.
Mit dem neuen macOS 15 bin ich über ein Problem mit dem Cisco Secure Client gestolpert, man kann in der Version 5.1.2.42 und auch in 5.1.3.62 nicht mehr die notwendigen Berechtigungen setzen, damit der VPN Dienst richtig läuft. Als Konsequenz verweigert der Secure Client den Verbindungsaufbau zum VPN-Gateway.
Als Fix, bis Cisco das selber mit einem neuen Release repariert, geht Folgendes:
Öffne das Programm Terminal (aus Programme/Dienstprogramme) und gib dort folgende Befehle ein.
Kennt Ihr das auch? Ihr seid gerade in einer Videokonferenz auf zoom und dann klingelt es in MS Teams und in Rocket.Chat trudeln noch Nachrichten ein. Oder ihr telefoniert gerade und Euch wollen die Leute parallel via Teams anrufen?
Ich habe mir mit Applescript und den Kurzbefehlen einen Mechanismus gebaut, der auf Knopfdruck (also leider nicht vollautomatisch) die anderen Videochatprogramme auf DoNotDisturb(DND) beziehungsweise auf Nicht stören setzt, wenn man in dem anderen Programm gerade beschäftigt ist. Außerdem werden Systembenachrichtigungen stumm geschaltet über die Fokus-App.
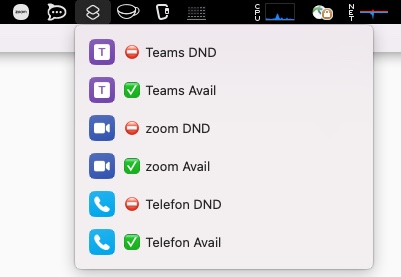
Hier ist das Kurzbefehle-Menü zu sehen mit den entsprechenden Einträgen für Teams, Zoom und Telefon.
Wählt man beispielsweise ⛔️ zoom DND aus, so wird in MS Teams und Rocket.Chat der Status auf DoNotdisturb gesetzt. Bei der Auswahl von ✅ zoom Avail dann entsprechend wieder auf Available beziehungsweise Verfügbar. Genauso funktioniert es bei der Auswahl von ⛔️ Teams DND, nur dass der Status in zoom nicht über das Menü einstellbar ist, daher wird zoom dann geschlossen und bei ✅ Teams Avail dann wieder automatisch gestartet.
Der Eintrag ⛔️ Telefon DND bringt alle drei Programme in den entsprechenden Modus, nicht nur ausgewählte.
Wie funktioniert das ganze? Ich habe folgende Applescript-Dateien angelegt und führe diese Skripte aus, wenn über die Kurzbefehle-App einer der obigen Einträge ausgewählt wurde.
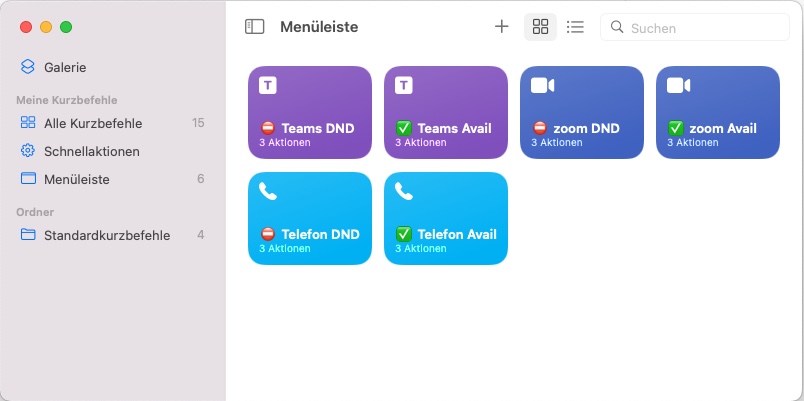
Die im Menü anzuzeigenden Einträge lassen sich in der Kurzbefehle-App verwalten.
Gucken wir uns einmal den ⛔️ Teams DND Eintrag genauer an. Zuerst wird ein Shell-Skript ausgeführt, welches zoom auf DND setzt. Ok, ist etwas geschummelt, habe ich oben ja schon geschrieben, das Skript beendet zoom. Anschließend wird per API Aufruf der Status in Rocket.Chat angepasst und am Ende Fokus Videokonferenz aktiviert.
Der Ablauf des Teams DND Skriptes.
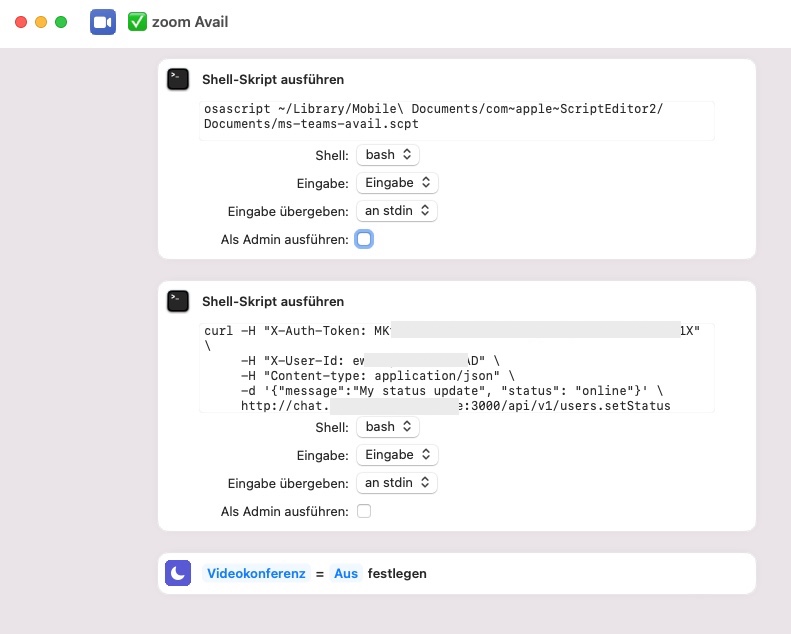
Das wieder auf Verfügbar schalten können wir uns am Beispiel von ✅ zoom Avail anschauen. Zuerst wird MS Teams auf Available geschaltet, dann Rocket.Chat und am Ende wird der Fokus wieder deaktiviert.
Der Ablauf des zoom Available Skriptes.
Beim Telefon-Eintrag werden Zoom, Teams und Rocket.Chat entsprechend geschaltet, also alle auf DND oder Verfügbar.
Wenn man die Skripte in die iCloud legt, kann man sie auf verschiedenen Macs verwenden. Das macht der Skripteditor standardmäßig. Die Kurzbefehle lassen sich ebenso teilen.
Mir ist beim Auswählen eines neuen Watch Themes aufgefallen, dass auf einmal die Komplikationen für Wetter, Regen und Temperatur verschwunden waren. Da dies Standard-Komplikationen von Apple waren kam mir das komisch vor. Nach einigem Suchen im Internet fand ich zwei Vorschläge: Neu Starten oder erneutes Koppeln der Uhr mit dem Smartphone. Leider hat beides das Problem aber nicht behoben.
Nun fiel mir ein, dass ich neulich meinen Homescreen aufgeräumt hatte, dabei ist auch die Wetter App von Apple deinstalliert worden. Ich verwende lieber die von Weather Pro. Die Wetter Komplikationen sind aber ein Teil der Apple Wetter App, daher sind diese dann automatisch mit deinstalliert worden.
Als ich auf dem iPhone die Wetter App wieder installiert hatte waren die Komplikationen auch wieder auf der Uhr verfügbar.
Seit gestern hat Apple iOS 8.4 freigegeben, kurz danach wurde ein Update für den Jailbreak von TaiG veröffentlicht, der nun auch iOS 8.4 unterstützt.
Zur Zeit ist es also noch möglich, iOS 8.3 und 8.4 zu jailbreaken, wobei die Unterstützung für iOS 8.3 demnächst eingestellt werden sollte, da Apple diese Vorgängerversion bald nicht mehr signieren wird. Damit ist dann das installieren der alten Firmware nicht mehr möglich.
Außerdem existiert das Programm zum jailbreaken momentan nur für Windows.
Eine gute englischsprachige Anleitung gibt es bei www.redmondpie.com, es sind aber ein paar Stolpersteine aus dem Weg zu räumen.
Codesperre ausschalten
Finde mein iPhone ausschalten
Flugzeugmodus anschalten
Die ersten beiden Punkte werden auch in der Anleitung erwähnt, den dritten habe ich im dortigen Supportforum als Tipp entdeckt.
Da nun die Unterstützung für iOS 8.4 ziemlich frisch ist, sind viele Tools noch nicht für iOS 8.4 getestet bzw. werden als nicht kompatibel angezeigt. Dies wird sich wie bisher auch im Laufe der Zeit ändern, wenn die Entwickler die Programme entsprechend anpassen.
Bis nun im Herbst iOS9 erscheinen wird, ist der Jailbreak für iOS 8.4 wahrscheinlich der Stand, auf dem man das iPhone längere Zeit betreiben möchte.
Falls Ihr ein Update auf OSX 10.10 Yosemity vorgenommen habt, könntet Ihr über ein paar Probleme gestolpert sein, die bei einer Neuinstallation auf einer sauberen Platte nicht vorkommen.
Latex und Homebrew
Vor dem Update sollte man selbst installierte Programme aus /usr/local/ verschieben, da sonst das Update mehrere Stunden dauern kann.
Dazu das Terminal-Programm starten und z.B. die LaTex-Installation ins Nutzerverzeichnis umziehen: sudo mv /usr/local/texlive ~
Hier muss noch das Admin-Passwort eingegeben werden.
Nun kann das Update auf OSX 10.10 erfolgen.
Danach muss das Ganze wieder zurück, dazu folgendes eingeben: sudo mv ~/texlive /usr/local
Dies gilt ebenso für Homebrew oder andere Programme, die unter /usr/local/ Dateien ablegen.
Nicht mehr benötigte, alte LaTex-Installationen sollte man vorher finden und löschen über: ls -l /usr/local/texlive/ sudo rm -r /usr/local/texlive/2012/ für LaTex 2012 z.B.
Reste vom alten Betriebssystem
Nach dem Update hatte ich noch Reste des Vorgänger-Betriebssystems gespeichert unter: /Previous System/. Beim Versuch, dieses Verzeichnis zu löschen bekam ich die Fehlermeldung, das der Zugriff verweigert werde. Das Problem ist anscheinend eine Datei mit Namen sleepimage, welche besondere Berechtigungen aufweist. Diese muss man der Datei erst entziehen, damit man den Ordner löschen kann.
Dazu gibt man folgendes im Terminal-Programm ein und gibt das Admin-Passwort ein: sudo chflags noschg /Previous System/private/var/vm/sleepimage
Anschließend kann man die Datei löschen mit: sudo rm /Previous System/private/var/vm/sleepimage
Nun kann man den Ordner /Previous System/ in den Papierkorb ziehen und diesen löschen.
Diesen Jailbreak mit Namen evasi0n, sowie den für iOS6 hat das Team evad3rs entwickelt.
Infos zum Verfahren des Jailbreaks und Hilfe findet man z.B. hier: http://iclarified.com
Auf dem Gerät befindet sich nach dem Jailbreak nun der alternative AppStore Cydia.
Dort gibt es mittlerweile einige Erweiterungen und Programme, die das Gerät noch besser nutzbar machen bzw. die es um Funktionen erweitern, die Apple nicht vorgesehen hatte.
Meine Favoriten bei Cydia, die auch unter IOS 7 laufen, werde ich im Folgenden etwas erläutern.
AlwaysClear: Blendet das Löschen-Symbol im NotificationCenter ein
Calendar for Lockscreen: Kostenpflichtig, blendet Kalendereinträge im LS ein
CCSettings: Blendet mehr Schalter wie z.B. VPN, 3G im Control Center ein
CyDelete7: Ermöglicht das Löschen von Cydia-Apps wie gewöhnliche Apps
Edit Alarms: Die Weckerzeiten direkt bearbeiten
f.lux: Passt die Helligkeit und Farbtemperatur an die Beleuchtungssituation an
FakeCarrier: Eigenen Providernamen anzeigen
FiveIconDock: Ermöglicht fünf anstatt vier Icons unten im Dock
iCaughtU: Diebstahlsicherung, die Fotos beim fehlerhaften Entsperren erstellt
Infinifolders: Kostenpflichtig, dafür hat man in Ordnern mehr Möglichkeiten
MultiIconMover:Mehrere Icons auf einmal verschieben
OpenSSH: SSH-Server, für SSH-Zugriff aufs iPhone (root-Passwort ändern!)
PowerSoundDisabler:Keine Töne oder Vibrationen beim Anschluss an Strom
PrivaCy: Datensammeln und ausspionieren unterbinden
Protect My Privacy: Zugriff von Apps aufs Adressbuch etc. steuern
Purge: Alle Apps auf einmal aus dem Taskmanager entfernen
SwipeShiftCaret: Zur einfacheren Korrektur von Text-Eingaben
Leider sind viele der „alten“ Tools noch nicht IOS7-kompatibel aber daran ändert sich hoffentlich bald etwas, da die Entwicklung ja in vollem Gange ist.
Übrigens kann man den Jailbreak rückgängig machen, wenn man über iTunes Wiederherstellen des iPhones auswählt.
Update: Habe die Liste noch um ein paar Punkte ergänzt.
Um glogg, ein grafisches, auf qt4 basierendes Tool zur Logfile Analyse unter Mac OSX 10.9 zum Laufen zu bekommen sind eine Hürden zu nehmen und Klippen zu umschiffen. Diese Anleitung beschreibt den Weg und teilt sich in zwei Teile:
Installation von qt4 unter Mac 10.9
Kompilieren von glogg mittels qt und boost und xcode
Außerdem sind einige Voraussetzungen zu schaffen, die hier erläutert werden.
Befehle für das Terminal sind kursiv dargestellt, wichtiges fett.
Beginnen wir also mit Teil 1, der Installation von qt4 unter Mac OSX.
Wir benötigen xcode und homebrew, um die entsprechenden Werkzeuge verwenden zu können. Wenn brew bereits läuft, geht es mit Schritt 2 weiter.
Über Homebrew kan man hier informieren: http://brew.sh
Zur Installation folgendes in ein Terminal-Fenster einfügen und dem Dialog folgen: ruby -e "$(curl -fsSL https://raw.githubusercontent.com/Homebrew/install/master/install )" xcode gibt es im AppStore.
Nachdem nun homebrew läuft, geht es an die Installation von qt4. Hier gibt es unterschiedliche Möglichkeiten, qt zu installieren:
Bei mir hat die erste nicht funktioniert, sie meldete:
# clang: error: linker command failed with exit code 1 (use -v to see invocation)
# make[3]: *** [../../../../../../lib/QtWebKit.framework/QtWebKit] Error 1
# make[2]: *** [release] Error 2
# make[1]: *** [sub-WebKit-qt-QtWebKit-pro-make_default-ordered] Error 2
# make: *** [sub-webkit-make_default-ordered] Error 2
Daraufhin habe ich den Patch aus Methode 2 verwendet, das klappte. Weitere Informationen zur Methode Nummer zwei: https://github.com/mxcl/homebrew/pull/23793
Nach einer guten Stunde ist der Mac fertig, qt (4.8.5) läuft jetzt.
Nun zu Teil 2, dem Kompilieren von glogg
Für glogg benötigen wir boost, dieses installieren wir über homebrew: brew install boost
Nun können wir mittels qt ein Makefile erzeugen: qmake
Dieses Makefile muss aber eventuell noch etwas angepasst werden, da sonst das Kompilieren fehlschlägt. In der Zeile CXXFLAGS bitte folgendes ergänzen, wenn boost mit -c++11 kompiliert wurde: -stdlib=libc++ -std=c++11
Außerdem bei MACOSX_DEPLOYMENT_TARGET den Wert auf 10.9 ändern.
Weitere Infos: http://stackoverflow.com/questions/8454329/why-cant-clang-with-libc-in-c0x-mode-link-this-boostprogram-options-examp
Nun endlich können wir kompilieren: make
Die App wurde erstellt, aber das Icon stimmt nicht. Das beheben wir jetzt:
wir öffnen glogg48.ico mit Vorschau
drücken Command+a
drücken Command+c
wählen nunn glogg.app aus
drücken Command+i
wählen das Icon oben links aus
drücken Command+
Anleitung von http://osxdaily.com/2013/06/04/change-icon-mac/
Nun kopieren wir die App nach Programme: cp glogg.app /Applications/.
Fertig
Nun noch einmal die KurzfassungaufEnglisch:
# 1 install homebrew if not already installed
# documentation is here http://brew.sh/
# paste in terminal and follow the dialog ruby -e "$(curl -fsSL https://raw.githubusercontent.com/Homebrew/install/master/install )"
# 2 install qt4
# this may take a while
# 2a install qt via brew
brew install qt
# 2b install patched qt4 via brew if errors like the following occure on step 2a
# clang: error: linker command failed with exit code 1 (use -v to see invocation)
# make[3]: *** [../../../../../../lib/QtWebKit.framework/QtWebKit] Error 1
# make[2]: *** [release] Error 2
# make[1]: *** [sub-WebKit-qt-QtWebKit-pro-make_default-ordered] Error 2
# make: *** [sub-webkit-make_default-ordered] Error 2
# see also https://github.com/mxcl/homebrew/pull/23793 brew install https://github.com/cliffrowley/homebrew/blob/master/Library/Formula/qt.rb
# 3 install boost with clang-cpp-option
brew install boost
# 9 change app icon
# more info http://osxdaily.com/2013/06/04/change-icon-mac/
# open glogg48.ico in preview
# press Command+a to select everything
# press Command+c to copy the image
# press Command+i on glogg.app to get info
# select app icon on the top left corner
# press Command+v to insert the image
# 10 copy glogg to Applications
cp glogg.app /Applications/.