At work, our Windows computers are bound to AD, they use the AD-integrated PKI to generate device certificates. These certificates are then utilized to get 802.1X authenticated network access, both wired and Wi-Fi.
Our Macs are not bound to AD, but managed with Jamf Pro as our MDM system. In order to also bring the Macs into the network, we had to prepare a few things:
- Set up a separate certificate authority (CA), at best on premise and also without additional costs.
- Chose a protocol for certificate creation, SCEP or ACME.
- Build a configuration profile for Jamf, so the Macs get certificates and also renewals.
- Integrate our new CA into our network tool (Cisco ISE)
Our options for free, open source and locally deployable CA’s are quite limited, also the support for Managed-Device-Attestation (MDA) from Apple was desired. This led us to smallstep’s step-ca in conjunction with the Step Posture Connector and ACME as the protocol that supports MDA.
1. The CA
Let’s start with the setup of step-ca on an Ubuntu server. The firewall has to allow Port 443 for all the jamf servers, and for the company network, so the Macs can also reach it. Additional documentation from smallstep is available here:
https://smallstep.com/docs/step-ca/installation/#debianubuntu
https://smallstep.com/docs/step-ca/acme-basics/
https://smallstep.com/docs/step-ca/provisioners/#acme
https://smallstep.com/blog/private-acme-server/
# create the CA
step ca init
…
✔ Deployment Type: Standalone
What would you like to name your new PKI?
✔ (e.g. Smallstep): OurTestCA
What DNS names or IP addresses will clients use to reach your CA?
✔ (e.g. ca.example.com[,10.1.2.3,etc.]): catest.domain.name
What IP and port will your new CA bind to? (:443 will bind to 0.0.0.0:443)
✔ (e.g. :443 or 127.0.0.1:443): :443
What would you like to name the CA’s first provisioner?
✔ (e.g. you@smallstep.com): your.address@domain.name
✔ [leave empty and we’ll generate one]:
✔ Password: ThisIsATopSecretRootPasswordExampleGenerating root certificate… done!
Generating intermediate certificate… done!
Take good care of the newly created root password!
Now, let’s move the CA to /etc/step-ca and create a daemon to start it automatically. See this guide for it. The root password should now be in /etc/step-ca/password.txt
Best practice for additional security is to change the password for the intermediate certificate, as it is used to sign our device certificates, and it then differs from your root certificates‘ password. See also this guide.
step crypto change-pass $(step path)/secrets/intermediate_ca_keyNow, we can configure the step-ca to use ACME and also to use MDA. We have to add a provisioner:
step ca provisioner add acme-da --type ACME --challenge device-attest-01
--attestation-format apple
✔ CA Configuration: /etc/step-ca/config/ca.json
Success! Your
step-caconfig has been updated. To pick up the new configuration SIGHUP (kill -1 ) or restart the step-ca process.
Optionally, you can install the new CA certificates on the Ubuntu server via:
step certificate install $(step path)/certs/root_ca.crtThey can be also downloaded from the server:
https://catest.domain.name/roots.pem
https://catest.domain.name/intermediates.pem
The CA on its own is now ready to use, but for signing device certificates, we need a template. You can use this example for it. The file should be here:
/etc/step-ca/templates/certs/x509/leaf.tpl
It must also be added to the ca.json configuration.
We should also switch from file-based configuration to a database by enabling the remote provisioner management feature.
2. The Step Posture Connector
The final step for the CA setup is the creation of a webhook. It is later used by the Step Posture Connector to enable the CA to talk to Jamf and Apple.
step ca provisioner webhook add acme-da step-posture-connector --url https://localhost:9443/webhook/device-attest?mode=computer✔ CA Configuration: /etc/step-ca/config/ca.json
No admin credentials found. You must login to execute admin commands.
✔ Please enter admin name/subject (e.g., name@example.com): step
✔ Provisioner: your.address@domain.name (JWK)
Please enter the password to decrypt the provisioner key:
Webhook ID: 5022a074-2b05-4n87-someMoreCharacters
Secret: ThisIsATopSecretWebhookSecretExample
As the Connector runs on the same server, we use localhost:9443 as URL. For Jamf Pro, we have to select the device type, as mobiles are handled differently as computers.
Take a note of the Webhook-ID and the Secret, both are needed later.
We should change the expiration period of the certificates, as in default they last only 24 hours. We chose 90 days => 2160 hours.
step ca provisioner update acme-da --x509-min-dur 20m --x509-default-dur 2160hOur CA uses the binary for Step Posture Connector, not the Docker container. As it is a standard Linux server, we took the amd64 file. It is then copied to /srv/www/htdocs on the server.
Also create a /srv/www/htdocs/ssl directory for the TLS certificates. Now we can use our CA to create the TLS certificates:
step ca certificate localhost server.pem server.key
# copy these to /srv/www/htdocs/ssl
cp server.pem /srv/www/htdocs/ssl/server.pem
cp server.key /srv/www/htdocs/ssl/server.key
# also copy the intermediate cert
cp /etc/step-ca/certs/intermediate_ca.crt /srv/www/htdocs/ssl/ca.pem
Since this certificate expires regularly, it has to be renewed, at best in a cronjob:
step ca renew --force /srv/www/htdocs/ssl/server.pem /srv/www/htdocs/ssl/server.keyWe need a Jamf API role for the Connector, see also here. Take a note of the Jamf Client ID and Jamf Client Secret.
All these go into the .env configuration file in /srv/www/htdocs/, see also here.
Let’s start the connector and see, if everything is fine:
/srv/www/htdocs/step-posture-connector_1.0.0_amd64Everything is fine? Then create a cronjob and start the Connector @reboot and in background. Consider running the Connector as a normal user, not as root.
3. Jamf Configuration Profiles
Now to the fun part. Create a Jamf configuration profile that contains your Root- and Intermediate Certificates (and also the certificate the network infrastructure uses), so the Macs trust your newly created CA.
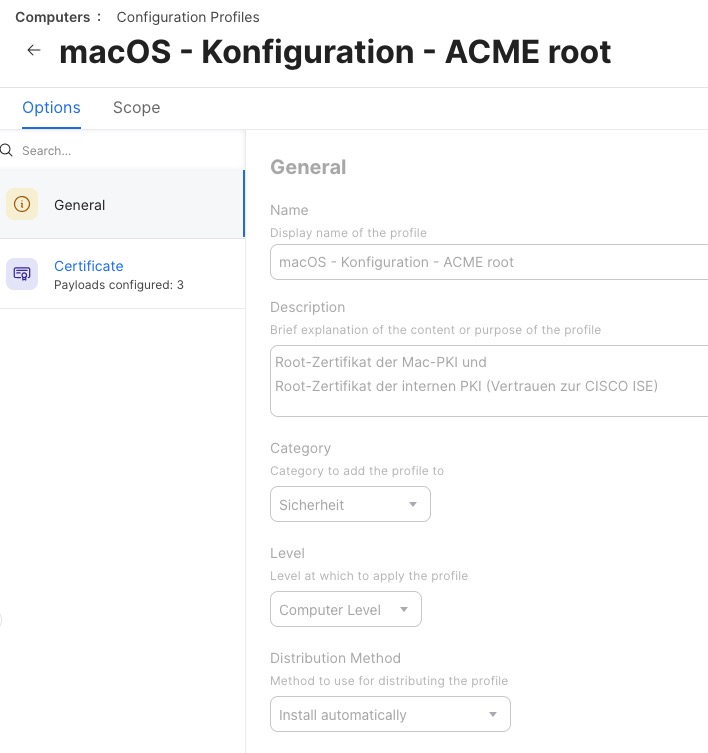
The real fun starts now. Create a Jamf configuration profile with the ACME Payload, the certificate the network infrastructure uses and network configuration payload, all in one profile.

Let’s take a look at the details. The ACME payload sets the step-ca server, the encryption details, and enables attestation via MDA. The certificate’s Common Name (CN) is set to the serial number of the Mac, so we use the variable $SERIALNUMBER twice.

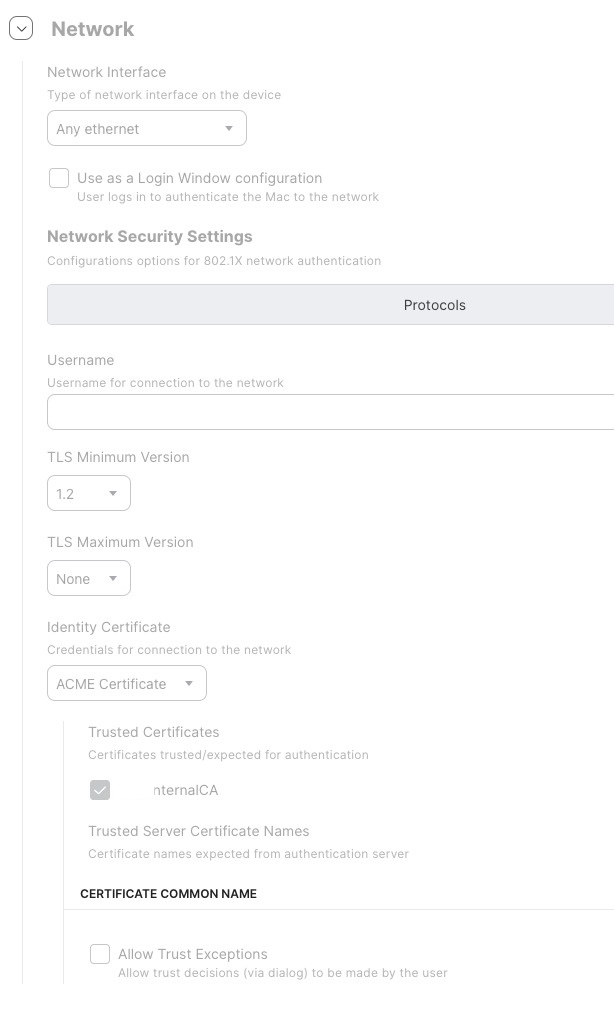
The Network payload uses the just configured ACME certificate and also the additional certificate for trusting our Cisco ISE. We use EAP-TLS.
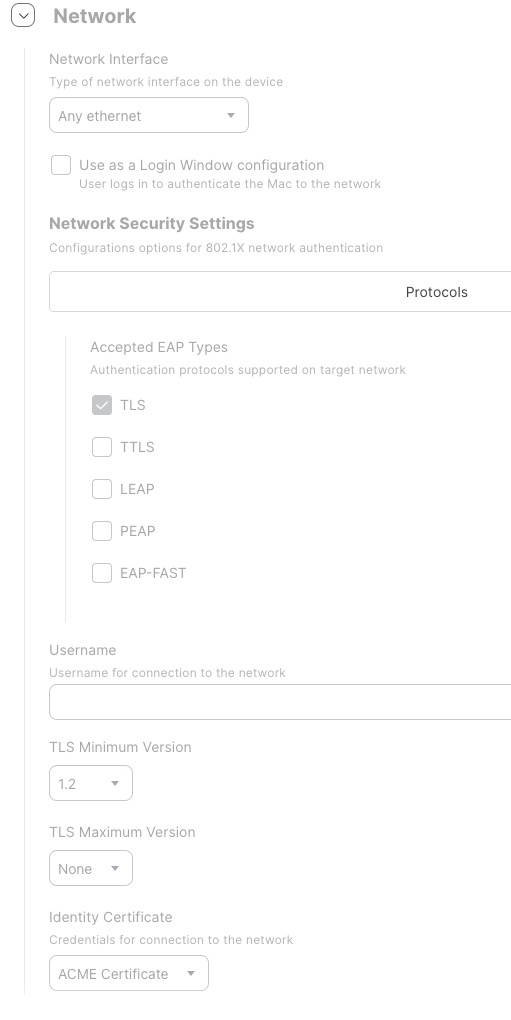
The trust settings can be seen here:
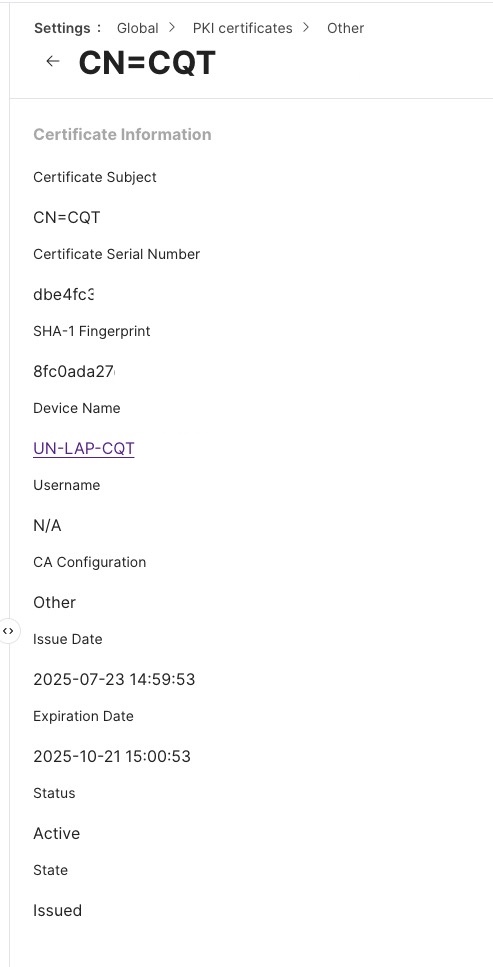
When these configuration profiles are deployed, the Macs then get a certificate.
Screenshot
The sequence of the certificate generation with ACME protocol can be seen in this diagram. It shows, how all the components work together.
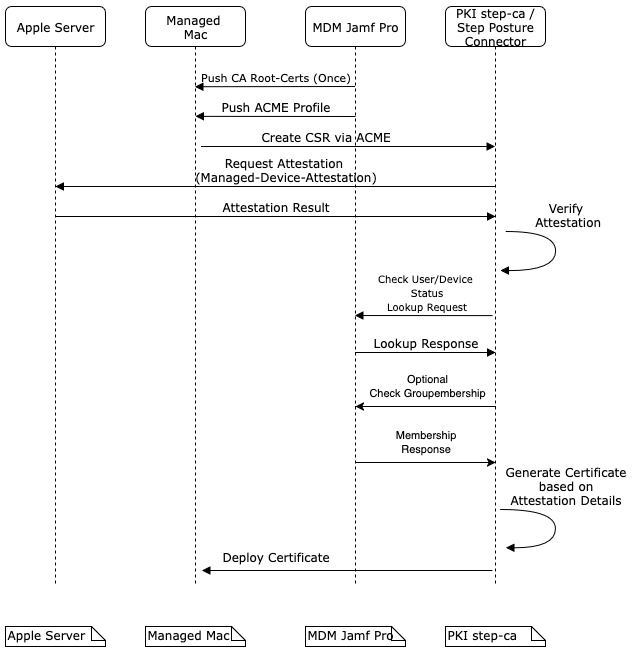
Sequence diagram of certificate generation with ACME.
The certificates are valid for 90 days, they are automatically renewed, when the Macs are a part of the companies network, e.g. Wi-Fi or LAN on premise or via VPN.
4. Network access
Our Cisco ISE needed the Root- and Intermediate-certificates and imported them.
When a Mac now connects to a network port, it shows the device certificate, the ISE matches the issuer of the certificate with the ones it imported before and if everything checks out, the ISE grants network access to a special, 802.1X protected subnet and the Mac gets an IP address.
That’s it.
5. Caveats
It works fine with ARM Macs, with Intel Macs we’ve had some issues. The MDA has to be deactivated, thus only Intel Macs with T2 chip could possibly work, older would ones definitely not.
Our T2 Macs failed to get a certificate, but they are going to be replaced anyway.
Update 01.08.2025: See part 2 for further configuration of the renewal process.